
Ombré Chocolate Cheesecake
Description
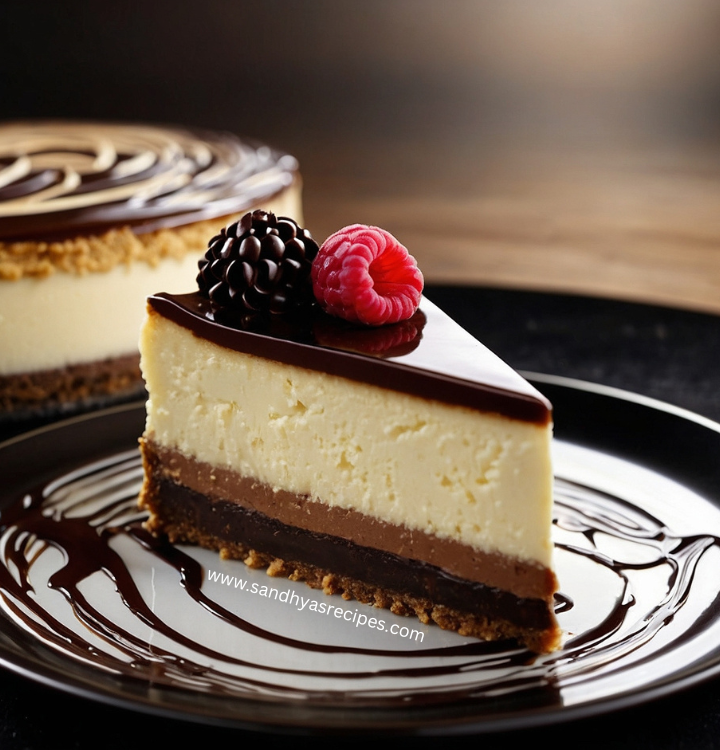
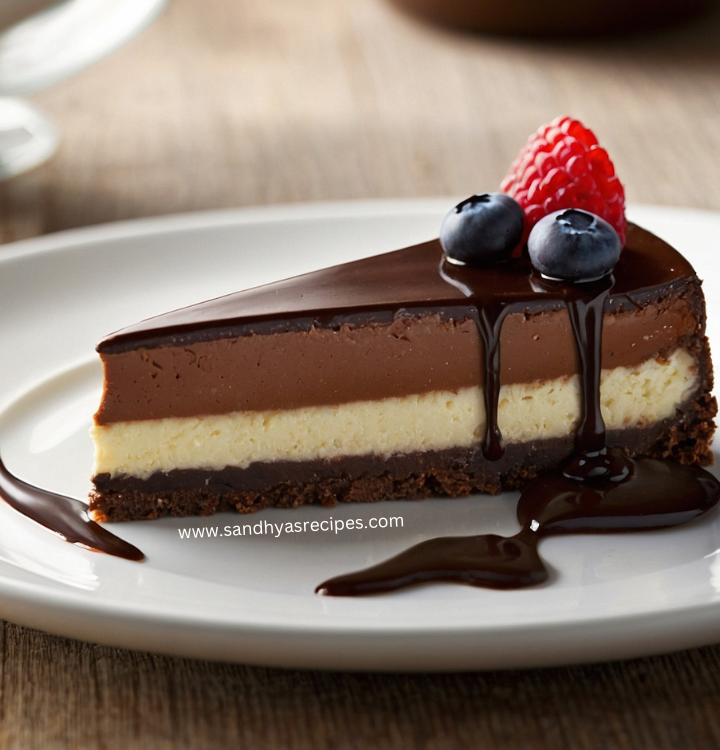
Indulge in the Decadence: Crafting an Ombré Chocolate Cheesecake
As you embark on the journey to create a masterpiece dessert, envision layers of velvety cheesecake interlaced with rich chocolate, harmonizing in a delightful ombré spectacle.
The journey begins with the meticulous assembly of the base, where the humble Oreo and Nutrichoice biscuits unite in a crunchy symphony. Their crumbly essence, when combined and pressed into the base of a pan, lays the foundation for the indulgence that is to come.
In a grand mixing ritual, the protagonists of our confection, led by the sweet embrace of Milkmaid, converge. Hung Curd and Cream Cheese join the ensemble, their textures blending seamlessly to form a creamy canvas.
With precision and finesse, cornflour is introduced, a silent conductor ensuring the symphony remains harmonious. A whisper of Vanilla Essence adds a delicate note, weaving its aroma into the fabric of the batter.
The batter, now a blank slate, eagerly awaits its transformation. Divided into three vessels, it embraces the nuances of flavor and color. Cocoa powder, the embodiment of richness, enriches the first bowl, infusing it with the essence of chocolate. In the second bowl, brown food coloring cascades like molten caramel, enveloping the mixture in a warm hue. The third bowl, untouched by additions, stands as a testament to simplicity, preserving the purity of its essence.
With meticulous care, the layers are arranged, each one a stroke in the masterpiece being unveiled. The white batter, a beacon of purity, lays the initial groundwork. It is followed by the brown, a testament to depth and warmth, and finally, the chocolate, the pièce de résistance, crowning the ensemble with its decadent allure.
As the pan enters the realm of heat, the layers harmonize, their flavors melding in a dance of transformation. In the confines of the oven, they undergo a metamorphosis, emerging as a unified entity, bound by the heat of creation.
Upon emergence, the cheesecake exudes an aroma that tantalizes the senses, a promise of the indulgence that awaits. Once cooled, a cascade of melted chocolate drapes over the surface, its glistening allure beckoning.
In the frosty embrace of the freezer, the cheesecake finds its final form, each layer setting in harmony with the next. Patience becomes a virtue as time suspends, allowing the flavors to meld and mature.
And finally, as the dessert is unveiled, the knife slices through the layers with precision, revealing the ombré marvel within. Each portion is a testament to the artistry and dedication that went into its creation, a symphony of flavors and textures that captivates the palate.
Garnished with a flourish of chocolate shavings or a dusting of cocoa powder, each slice becomes a masterpiece unto itself. With each bite, indulge in the decadence of the Ombré Chocolate Cheesecake, a testament to the artistry of the culinary craft.
"Ingredients for Irresistible Ombré Chocolate Cheesecake"
For the Base:
For the Cheesecake Filling:
For Decoration:
"Crafting the Perfect Ombré Chocolate Cheesecake: Step-by-Step Instructions"
-
Prepare the Base:
- Combine the crushed Oreo and Nutrichoice biscuits in a bowl.
- Mix well until evenly combined.
- Press the mixture firmly into the base of a pan, creating a smooth layer. Set aside.
-
Prepare the Cheesecake Filling:
- In a large mixing bowl, combine the sweetened condensed milk, hung curd, cream cheese, cornflour, and vanilla essence.
- Mix until smooth and creamy, ensuring there are no lumps. You can use a hand mixer for this step if needed.
- Divide the batter evenly into three separate bowls.
-
Add Coloring and Flavor:
- In the first bowl, add cocoa powder and mix until fully incorporated to create a chocolate-flavored batter.
- In the second bowl, add brown food coloring and mix well to achieve a deep brown color.
- Leave the third bowl as is for a classic white cheesecake layer.
-
Layer the Batter:
- Preheat the oven to 160 degrees Celsius for an OTG or 180 degrees Celsius for a microwave convection oven.
- Starting with the white batter, pour it over the prepared biscuit base and spread evenly.
- Next, pour the brown batter over the white layer, spreading it evenly to cover.
- Finally, pour the chocolate batter over the brown layer, ensuring it covers the entire surface.
-
Bake the Cheesecake:
- Place the pan in the preheated oven and bake at 160 degrees Celsius for 20-25 minutes in an OTG, or at 180 degrees Celsius for 30-35 minutes in a microwave convection oven.
- Bake until the cheesecake is set and the edges are lightly golden brown.
-
Decorate and Chill:
- Once baked, remove the cheesecake from the oven and allow it to cool completely at room temperature.
- Once cooled, drizzle melted chocolate over the top of the cheesecake, spreading it evenly.
- Place the cheesecake in the freezer and let it set for 4-5 hours, or until the chocolate layer is firm.
-
Serve and Enjoy:
- Once set, remove the cheesecake from the freezer and let it sit at room temperature for a few minutes to slightly soften.
- Carefully slice the cheesecake into portions using a sharp knife.
- Garnish with chocolate shavings or cocoa powder before serving.
- Serve chilled and enjoy the decadent layers of this Ombré Chocolate Cheesecake!
Nutrition Facts
Servings 8
- Amount Per Serving
- Calories 400kcal
- % Daily Value *
- Total Fat 25g39%
- Saturated Fat 15g75%
- Cholesterol 50mg17%
- Sodium 250mg11%
- Total Carbohydrate 35g12%
- Dietary Fiber 2g8%
- Sugars 25g
- Protein 9g18%
* Percent Daily Values are based on a 2,000 calorie diet. Your daily value may be higher or lower depending on your calorie needs.
Note
-
Room Temperature Ingredients: Ensure that your cream cheese, hung curd, and other dairy ingredients are at room temperature before mixing. This helps in achieving a smoother batter without lumps.
-
Consistency of Batter: Aim for a smooth and creamy consistency when mixing the cheesecake batter. This ensures that your cheesecake has a uniform texture after baking.
-
Pan Preparation: Line the bottom of your pan with parchment paper to prevent the cheesecake from sticking. Additionally, you can grease the sides of the pan lightly to ease removal after baking.
-
Baking Time: Keep an eye on the cheesecake while it's baking, as oven temperatures may vary. The cheesecake is done when the edges are set but the center still has a slight jiggle. Overbaking can lead to a dry texture.
-
Cooling and Chilling: Allow the cheesecake to cool completely at room temperature before adding the chocolate topping and chilling in the freezer. This helps in preventing condensation on the surface of the cheesecake.
-
Serving: For clean slices, use a sharp knife dipped in hot water and wiped dry between each cut. This ensures neat edges and preserves the visual appeal of the ombré layers.
-
Garnish: Get creative with garnishes! Consider topping your cheesecake with fresh berries, chocolate curls, or a drizzle of caramel sauce for an extra touch of elegance and flavor.
-
Storage: Store any leftover cheesecake slices in an airtight container in the refrigerator for up to 3-4 days. Remove from the fridge and let it sit at room temperature for a few minutes before serving for the best texture.

Your recipies is superb